Overview
Configuring your P4W Desktop
Most of us arrange our working environment in such a way as to enable us to be both productive and comfortable. The aesthetics of the working environment are also important. We want to sit at a desk that is welcoming, comfortable, and familiar.
It’s just as important to ensure that the software we use for most of the working day also conforms to these principles. If it doesn’t, we risk a poor user experience leading to inefficiency and frustration.
This article seeks to provide suggestions as to how you might configure your P4W Desktop to create the best experience for you.
Start-up
You may find on your instance of P4W that several items are opened automatically upon start-up when you first login.
If you don’t need or use some or any of these, then you will start every P4W session by closing down these functions; which is both frustrating and time-wasting.
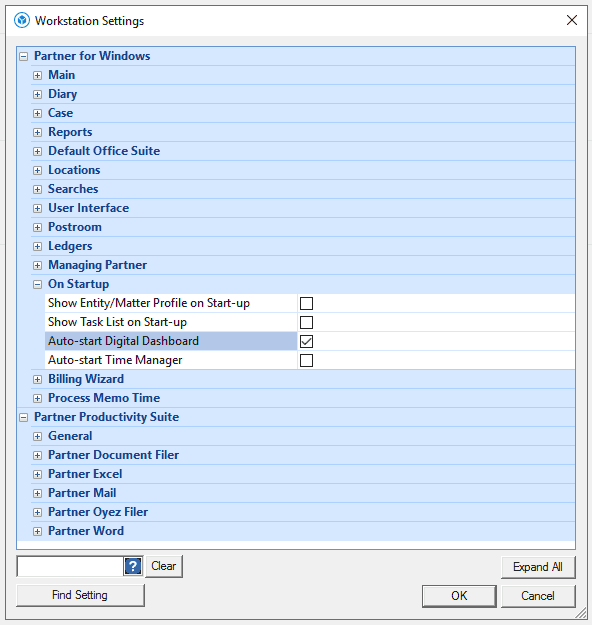
Within Workstation Settings, go to the Start-Up menu to reveal what, if any, items are ticked to automatically fire up on login. As you can see from the screen shot, there are 4 potential options here:
To add or remove any of these functions from the automatic start-up process, simply tick or untick to suit. Log out of P4W and then, when you next log in, the changes will take effect.
The Ribbon Bar
Let’s start at the top of the P4W screen with the Ribbon Bar. There are a couple of useful options that determine how it is presented to you:
- Autohide: If, like me, you prefer an uncluttered desktop and a larger working area on screen, then minimising the ribbon bar when not in use is a great way of achieving both objectives. To do this, right-click anywhere on the Ribbon Bar and select “Minimise the Ribbon”.Once you’ve hidden the ribbon bar, to see it, just click on the ribbon bar heading that you want to open and it will come to screen for you to select from. Once the option is selected, it will automatically minimise again. To restore the ribbon bar so that it is always showing, just right-click on it and untick the “Minimise the Ribbon Bar” option.
- Hide unused icons: In its default view, the Ribbon Bar shows every available option in P4W; even if you don’t need or have access to some of them. This adds confusing, greyed-out icons to the Ribbon Bar which serve no purpose. To remove these, there is an option in Workstation Settings\User Interface\Show Disabled Ribbon Icons which needs to be unticked as per the screenshot. Log out and log back into P4W and you should be presented with a cleaner Ribbon Bar with the greyed-out icons removed.
The Quick Access Toolbar
Like other Windows applications, P4W has a Quick Access Toolbar. As the name suggests, this is designed to provide the user with one-click access to their favourite functions.
By default, P4W comes with 3 items in the Quick Access Toolbar:
- New Profile.
- Case Manager.
- Find an Entity/Matter (aka Search).
What a lot of users don’t realise is that you can change these and add as many others as you like.
To add new ones, simply go to the option on a P4W menu (either the icon on the ribbon bar or one of the drop-down items on a sub-menu). Highlight the icon or option, right-click, and select “Add to Quick Access Toolbar”. The item will then appear as a mini-icon alongside the existing options. Alternatively, you can click on the drop-down arrow at the right-hand end of the Quick Access Toolbar and select “More Commands” to open the window shown.
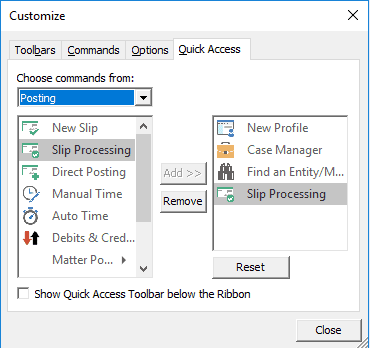
In the above example, I am adding Slip Processing to the Quick Access Toolbar which would be handy for someone based in the Accounts Department tasked with approving posting requests.
To amend the toolbar, right-click on any of the mini-icons and select “Remove from Quick Access Toolbar”. You can also do this with the default ones if you wish.
You can also decide on the positioning of the Quick Access Toolbar, by right-clicking on it and selecting to show it above or below the Ribbon Bar. This is perhaps less important if you hide the Ribbon Bar, but it’s there if you want to use it. Note the tick box at the foot of the above screenshot to achieve the same result.
Once an item has been added to the Quick Access Toolbar, you simply click on it to call up the function. So much quicker than trawling through menus to find it.
Think about those functions you use regularly and whether they would merit being added to the Quick Access Toolbar. You’d be amazed how much time time one-click access to your regularly used functions can save over the course of a working day.
The Task Panel
For me, this is one of the best innovations ever added into P4W.
The key objective of the Task Panel is to enable intuitive access into P4W via a number of launch options available in the various sections behind the buttons.
Let’s start with the visibility of the Task Panel.
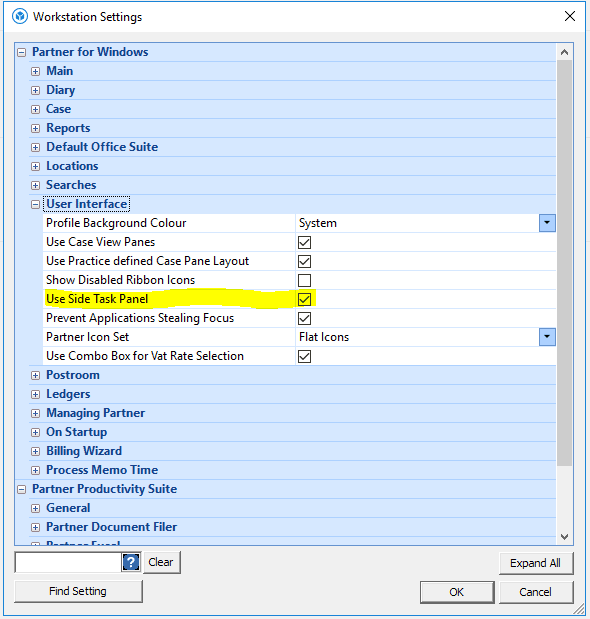
Firstly, you need to ensure that the Task Panel is switched on. You can do this by checking the box in Workstation Settings as shown here:
Once activated in Workstation Settings, you can choose to switch it off or back on again via the option on the Home Ribbon Bar as shown below:

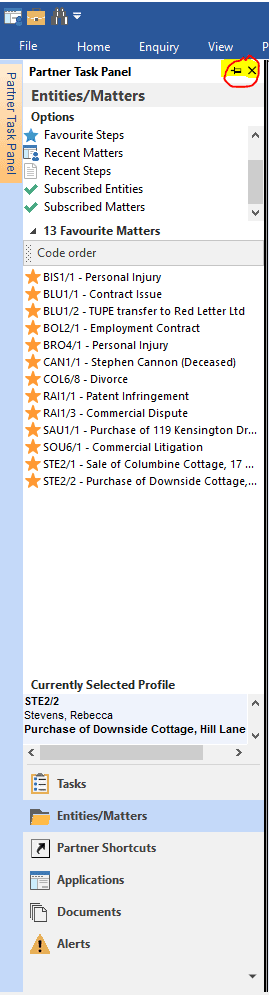
Like the Ribbon Bar, you can choose whether the Task Panel is always visible or disappears from screen until needed. You can do this by clicking on the pin icon when the Task Panel is on screen. Once clicked, the Task Panel slides off to the left of the screen. When you need it again, just hover over the “Partner Task Panel” tab at the left-hand side of the screen and it will slide out again. Once you’ve selected the required option, the Task Panel slides off to the left again.
If you accidentally hit the x in the Task Panel, which switches it off, just go the the Task Panel option in the Home ribbon bar and check the “Task Panel” option to reactivate it.
Please note that following initial login, if you have the Task Panel set to be hidden, it can take several seconds for it to appear for the first time. This is normal behaviour and only happens for the first use after logging in.
You can also adjust the width of the Task Panel by simply dragging the right-hand edge of the open panel to the desired width and letting go. Following this, the Task Panel will default to this width. This can be useful to avoid truncating client names and matter descriptions in the Task Panel.
Now let’s look at the different options available behind the Task Panel buttons:
- Tasks: All of your outstanding tasks from Case Manager will be shown and can be accessed from here to take the user directly to the reminder in the relevant case. The default view is to show today’s tasks; including any which are overdue and highlighted in red.
- Entities/Matters: Probably the most heavily-used function, this enables the user to add their own favourites from the following:
- Entities: Clients and other parties you regularly access.
- Matters: Ditto matters; perhaps those most active at present and or nearing completion.
- You can choose the order in which your favourite entities and matters are displayed by selecting the “Code Order” button above each list in the Task Panel.
- Steps: Documents held in Case Manager. Useful if you are working on a dynamic document which will be updated as negotiations progress. Steps can be ordered by Step ID number and or have a filter applied via the two options at the top of the Favourite Steps list.
- The matters and steps options also have a “Recent” option; thus listing those matters and steps that the user has recently accessed; regardless of whether they are saved as a favourite.
- More recently, an option to add Subscribed Entities and Matters into the Entities/Matters section of the Task Panel has been added. This enables a user to add other entities and matters for quick access that are not favourites, but need to be monitored. Useful for team leaders who wish to keep an eye on certain key matters and or clients being managed by their team.
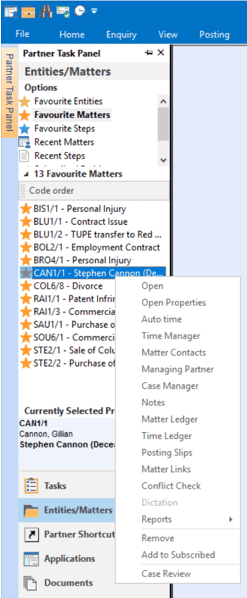
- A right-click on any of the above will reveal a sub-menu of options available as shown in the screenshot which can be directly accessed for the selected item.
- To add items as favourites, do the following:
- Entities & Matters: Click the star icon on the Entity/Matter profile screen for the selected entity/matter or the Entity or Matter Properties screen. You can also favourite an entity or matter from the results of a search by right-clicking on the relevant entry and selecting “Add to Favourites.”
- Steps: Right-click on the selected item in Case Manager and choose “Add to favourite Steps”.
- To remove a favourite, right-click on the entity, matter, or step in the Task Panel and select the “Remove from Favourites” option. (You can’t remove an item from the Recents list for obvious reasons).
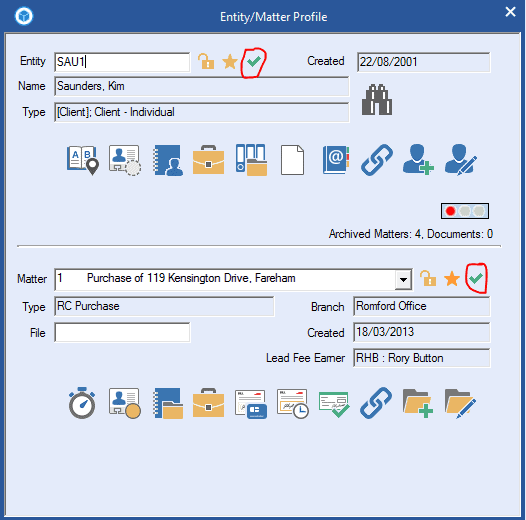
- To subscribe to an entity or matter, open the profile screen and select the green tick to the right of the entity code or matter description. You can also subscribe to entities and matters in your favourites via the right-click drop down menu shown in the screenshot under the last bullet point in 2 above.
- Partner Shortcuts: In here, you will find numerous, one-click shortcuts into P4W such as Create Client and Create Matter. Please note that you can only access functionality that you are authorised to use and the shortcuts provided in this section cannot be amended other than adjusting the size of the icons and whether a double-click is required to activate them.
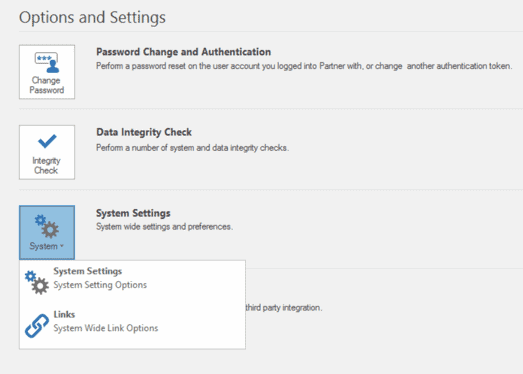
- Applications: This is a great function for enabling quick and easy access to other, third party applications, network resources, or web-sites that you use. The applications available can be configured globally by your P4W Administrator in the “System Wide Link Options” as shown. Individual users can then have a tailored, sub-menu of applications made available in the Task Panel via the User Links function within Maintenance\Users\Users, select the user and then “Properties”.
- Documents: The documents tab holds several functions as follows:
- Checked Out of Case: Where P4W Version Control is in use, this will show the user any documents that they currently have checked out for updating.
- Post to Review: For firms who use P4W Postroom to allocate scanned items to matters, this will show the Matter Fee Earner any items that have been allocated to their matters. Each item shows the client/matter and is date stamped along with an identifier as to who scanned the item. Right-clicking on an item provides the following options:
- Case Manager: Takes the user to the item within the Case file.
- Mark as Read: This removes the item from the Task Panel.
- View Document: Opens the document for reviewing.
- Case ReviewTime: This will list all time spent in open Case Manager files in P4W. To activate this function, the “Show Case Panes Timer” box in System Settings\Case\CoreSettings will need to be ticked by your P4W supervisor. Once activated, time will be automatically recorded each time you work in Case Manager. Once captured, the time is held in the Task Panel\Documents area under “Case Review Time” for the user to review and decide whether any of the time captured needs to be added to their time recorded by other means. This acts as a useful prompt; reminding the user that they have been working on files, but may not have recorded any time. To convert the entry into a formal time record, simply right-click on the selected entry and “Add to Timesheet” to complete the process. To remove an entry, right-click and select the option. Items over 30 days old are automatically purged from the system when the period end process is run on P4W.
- Alerts: The Alerts tab provides the user with various alerts triggered by applications and connected services including:
- Legal Portal
- Infotrack
- GB Group AML checks
- The MOJ A2A Claims Portal
Users of the Task Panel can select which buttons are shown via the “Add/Remove Buttons” option accessible via the drop-down arrow at the bottom right of the Task Panel. In addition, if you would prefer the Entities/Matters pane to have greater visibility, then select the “Show Fewer Buttons” option to extend your favourites list. The active buttons will then form mini-icons in a row at the bottom of the Task Panel.
Changing the Style and Palette of your Desktop
P4W has several “Styles” that you can select to change the overall look and feel of your instance of P4W. These can be selected from the “Option\Styles” drop-down menu at the top right of your P4W screen. The concept behind these was to enable users to configure their P4W experience to mimic the version of Office being used at their firm.
You will note that the list finishes at Word 2016; being the last style update that was made to P4W in line with Microsoft stopping its changing of the aesthetics of each release of Office and the move to Office 365.
Even so, you may find a style option that you feel provides a more pleasing aesthetic than the one you currently use. Word 2007 Blue has always been a popular choice and, to some, the one that best suits P4W.
I adopted the Word 2016 style when it came out and was delighted at the positive impact that it had on demonstrations. Where previously, we often heard that P4W “looks a bit dated”, immediately prospective clients commented that it looked fresh and modern. It’s amazing what a lick of paint will do!
Try them out for yourself and see what you think. Simply select an option and you’ll see that your P4W immediately changes to the new style. Don’t like it and want to try another? Just select another option and see how that one looks. Whichever one you choose, that will become your default style thereafter until you decide to change it again.
Summary
As you can see, the P4W Desktop has lots of useful configurability options designed to enable you to create an environment that works best for you. I have seen far too many cluttered and disorganised P4W Desktops when visiting client firms, but these were almost always the result of user ignorance. With a few clicks, you can potentially transform your experience of using P4W for the better, so if you’ve been struggling to get the best from the software, I hope that the tips above will help make a positive difference.
As always, please do check with your P4W supervisor(s) before making any of the changes to the Desktop as outlined above; just to make sure that these are accessible to you and approved for use.